As this guide’s already being shared around – please note it is only 50% done – Sumit (@admin)
Terms to Know
Here’s a list of terms used throughout this site that you may also come across within the game or in discussions regarding it:
Terms
Exclusive Weapon – a weapon that has additional effects when used by a specific hero. Example: Bianca and her weapon, Astarte.
Exclusive Weapon Passive – the additional effects that apply passively when equipped by a specific hero, generally modifying one of the hero’s abilities.
Exclusive Weapon Skill – the weapon skill on a hero’s exclusive weapon.
Heavenhold – your base that is unlocked early in the game, where you can gain access to various dungeons and farm SP by upgrading your buildings.
Limit Break – a system in the game allowing an item or hero to go past its maximum level by up to five in exchange for duplicate items or hero crystals.
Mono – means single, used to refer to teams consisting of heroes that all have the same element, for example mono fire.
Abbreviations
AoE – Area of Effect – used to refer to the ability to do damage to multiple enemies at once
CC – Crowd Control – occasionally used to refer to the ability to inhibit multiple enemies’ abilities to attack. For whatever reason, some people may use this to describe any stun, even if the ability only works on one enemy.
CD – Cooldown – commonly used to refer to the “Regen time” on a weapon skill. Can also be a reference to the “cooltime” of a passive effect on weapons and heroes.
DR – Damage Reduction – a stat that decreases damage received per hit by a flat amount.
EX – Exclusive Weapon – a weapon that has additional passive effects that can only be active when used by a specific hero, as described above.
HC – Hero Crystals – a resource primarily gained through summoning heroes that is used to limit break heroes.
HH or HHT – Heavenhold Tower – a “tower” type dungeon accessed from Heavenhold where each floor has a puzzle, encounters and bosses you must clear to progress to the end.
FP – Future Princess – abbreviated name of this particular hero.
FK – Future Knight – abbreviated name of this particular hero.
MLB – Max Limit Broken – a hero that has been limit broken the maximum amount of times (five times).
MM – Magic Metal – currency obtained by extracting weapons and pulling from equipment banners.
MR – Mirror Rift – a dungeon accessed from Heavenhold where you can farm end game accessories for each element.
OL – Orbital Lift – a tower accessed from Heavenhold with a massive amount of floors where you fight a battle on each one and try to progress as high as you can. More details in the content section of the guide.
Stats
Atk – a hero’s main damage modifier, which is affected by various buffs that apply to a hero based on the type of damage they deal, such as [Element], Ranged, or Melee Atk. Element attack isn’t based on the hero, but the element of the weapon they are using, while Ranged and Melee damage depend on the type of damage the hero’s abilities and their current weapon skill inflict.
Crit Hit chance – affects a hero’s chances of landing a critical hit, which deals 200% damage at base.
Crit Hit multiplier – affects the amount of damage that a hero’s critical hits are increased by, further than the 200% base.
Def – a hero’s main defensive stat to reduce incoming damage, which is affected by various buffs that apply situationally based on the type of incoming damage, such as Ranged Def and Melee Def.
DPS – a calculated representation of a hero’s damage potential based on their Atk, Crit Hit chance/multiplier and Weapon DPS, this is calculated before party buffs apply.
HP – a hero’s health, which determines how much damage a hero can take before they die.
Skill Atk – a modifier to boost the damage of a hero’s weapon skill and chain ability. Only works on chain abilities that do damage.
Weapon Skill Regen Speed – a stat that reduces the amount of time between uses of a hero’s weapon skill.
Should You Spend Money?
There are currently no aspects of the game behind a pay wall. While the banner rates can be abysmal at times, and there is only a one time pity, the game gives a fair amount of time gated free gems that can be used to pull any hero. More on this will be mentioned later in the guide when we talk about currencies.
New players also get to benefit from the one time pity system. When starting out you are guaranteed at least one 3★ hero in your first 30 hero summons, and one epic 5★ exclusive weapon in your first 30 equipment summons. The time and resource investment required to max out a 3★ hero is so large, that by the time you finish it, you’ll likely pull another one just through free gems.
The challenge is, most heroes need to be paired with their exclusive weapon to perform optimally. Most of the time, this is completely random, and trying to farm them when starting out will stunt your growth in other ways.
People that spend excessive amounts of money on the game also get the edge of being able to mass pull for duplicate copies of their equipment, allowing them to limit break equipment to a level that can take a very long time to achieve as an average spender or free player.
You can get all the 2★ heroes for free just by playing the game, with the exception of Gremory, Neva, and Rie. While still difficult to get, 2★ heroes have legend exclusive weapons, which are significantly less rare than the epic exclusive weapons that pair with 3★ heroes.
What’s Worth It?
So you’ve decided you want to throw some money at the game. Consider yourself warned, the cost of whaling can be exponential depending on how far you want to take it. If you just want to get a little boost, then here are a few ways to spend and get the most value for your money.
Guardian Pass $7.99 USD Monthly package that gives an exclusive weapon for a 2★ hero and awakening stones.
Limited Gem Packages $29.99-$39.99 USD On holidays and certain occasions there are packages with nine to ten thousand gems for less than half the regular price
Gem Subscription $9.99 USD Great value, 3000 gems for $10 is similar value (give or take) to the limited gem packages and this package allows you to do the daily discounted summon
Limited Coffee Packages $4.99 USD Similar to the gem packages mentioned above for special occasions, at this price point 500 coffee is a pretty good deal. Buying two 50 coffee refreshes per day (250 Gems) values 500 coffee at 1250 gems, meaning this is pretty close, and a decent way to accelerate your farming
Coffee Subscription $14.99 USD Slightly more expensive than the limited packages mentioned above, but still not a bad way to accelerate your farming
What Isn’t Worth It?
From top to bottom, these shop items start to descend into whale territory
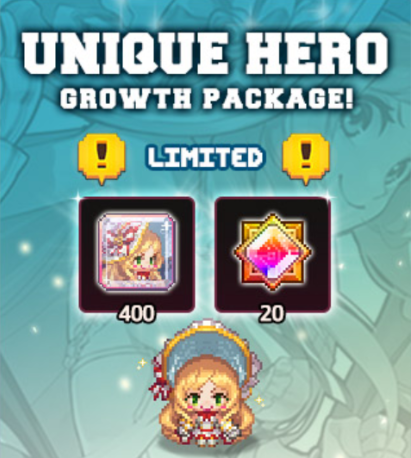
Hero Growth Packages $49.99 USD Package offered for 7 days after obtaining a 3* hero. Not as horrible as it seems, the 400 evolution stones are equivalent to roughly 3333 coffee, but you get no experience or gold out of it. Legendary Awakening Stones are quite scarce in this game, but this is overall a package targeted towards whales looking to pay for convenience
List of Free Heroes
Below is a list of free heroes and where to obtain them. You can read more about them by clicking their name to go to their individual pages, or by checking the Tier List.
As resources to invest in your heroes can be vary scarce in Guardian Tales, it is important to first plan out which heroes you want to max out. Here are a few steps to deciding that, as well as some team compositions you can consider.
Choose a 3★ Hero to Invest in First
New players have the benefit of a guaranteed 3★ hero in their first 30 hero summons, and an epic exclusive weapon in their first 30 equipment summons.
As such, when starting out, you should wait until you’ve progressed enough to obtain enough gems to do these summons before even thinking of who to invest in. Keeping in mind that a hero generally needs their exclusive weapon to be very effective, a good strategy is to try to get the current Rate Up hero as your guaranteed 3★ hero. When a hero has a Rate Up banner, there is usually a corresponding equipment banner for their exclusive weapon at the same time, so if the current hero banner is one you’re interested in, these banners are your best chance to get a hero/weapon pair from your guaranteed pity pulls. It also helps that the newest hero is usually one of the strongest in games like this.
If you have more than one 3★ hero already, pick one you like the most. You may be tempted to throw all your 3★ heroes on a single team, but they may not all work together very well.
Plan out a Team That Compliments Your Choice
Now that you have your 3* hero, it’s time to pick a team that goes well with them. It’s important to look at your heroes’ kits when determining what heroes would work well together. The general aim is to have all four heroes able to chain together, and all four benefiting from each other’s party buffs and abilities. However, in some cases there are other ways for heroes to fit in a team together, such as picking heroes that can boost an already effective hero without worrying about it working both ways.
Below are the two most common team structures that are the most versatile when it comes to content:
Tank, Main DPS, Support/DPS, Support/DPS
Tank, Tank, Main DPS, Support/DPS
For most content, you will likely want to have at least some healing built into one of the above roles. Some examples of heroes that can heal your team to some degree while fulfilling a different role are Garam and Future Princess, allowing you to save a slot for another DPS or Tank rather than a dedicated healer like Aoba. The caveat with this would be that the additional damage needs to be enough that you can kill enemies before the lesser healing becomes much of an issue, but this is not always the case.
It’s also important to mention that a “Support/DPS” in this context can be a healer like Miya, or just a hero whose primary purpose on your team is to boost other heroes by being present. An example of this would be Nari‘s presence on a team to boost a ranged DPS like Bari‘s damage using her party buff and debuff.
Make Sure Your Choices Can Chain
As mentioned earlier, an ideal team will have heroes which can be ordered in such a way that their chains link four times. Chains are abilities that can be triggered in sequence when your target reaches a certain percentage of the corresponding ailment for your hero.
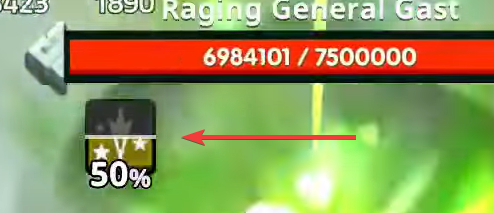
Ailments can be inflicted on a target using weapon skills. All weapons, with the exception of a few starter ones, have a weapon skill, and each weapon skill has an ailment infliction type such as Airborne, Injured, and Downed. When using a weapon skill on an enemy, you will build progress towards inflicting that ailment on the enemy until it reaches 100%, at which point you will be able to trigger a chain if its type matches that of the hero’s chain requirement. The progress can be seen under the enemy’s health bar as it builds as shown below.
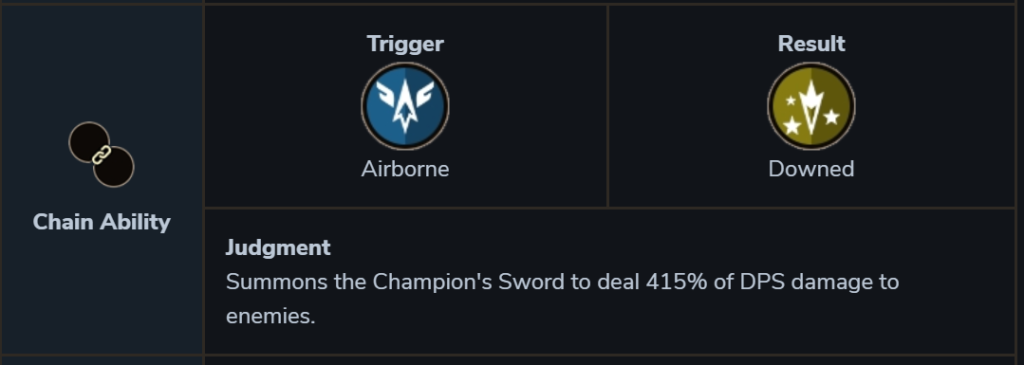
As an example – lets look at the Knight’s chain ability:
The trigger for his chain is Airborne, meaning he would need to use a weapon with an Airborne inflicting weapon skill in order to be able to start a chain. As you would expect, exclusive weapons always have the correct ailment type that goes with their corresponding hero’s chain ability.
You will notice that the chain result is Downed. This means that once the Knight uses his chain, the Airborne ailment on the enemy will change to Downed, allowing another hero on the team whose chain trigger matches to follow up with their own chain ability. This repeats as long as the results and triggers of your heroes’ chain abilities match up until you’ve used all four or run out of time.
In addition to stunning the enemy, ailments also have the following effects when they reach 100% on an enemy:
Airborne – ranged damage taken +50% Downed – melee damage taken +50% Injured – 200% damage dealt over time
So when it comes to optimizing your team, you can even go as far as trying to maximize the amount of time airborne is active on an enemy when using a primarily ranged team.
Choose a Team Lead
Weapon skills only get used by the lead hero on your team, meaning the hero in the first slot – whether you’re controlling them or not. This means that even if your team has an order in which they can chain four times, it will be impossible to do unless the first hero in that chain order is your lead. This is important to consider since not all heroes are well suited to be a lead.
Here are a few other things to factor in when choosing a lead for your team:
How frequently the hero can use their weapon skill, with regards to its cooldown and their total weapon skill regen speed
How many weapon skills it takes for the weapon skill to reach 100% of its corresponding debuff infliction and start a chain
The damage, range, and effects of their weapon skill
How well their toughness and/or A.I can handle being targeted: in certain types of content such as Kama-ZONE and Orbital Lift, there are enemies that specifically target the lead of your team
How to Progress Efficiently
There are several traps that you can easily fall into when progressing that can really stunt your progression. These tips will help you avoid these mistakes and efficiently invest in your heroes.
Which Heroes to Max First
Picking the order in which you max heroes can make or break your progression speed in certain content. It’s important to look at which heroes on the final team you’re working toward can work on multiple teams and which ones cannot. If you work on your most flexible heroes first, you’ll be able to adapt when you face stages that can be tough for your current (half built) team.
Some examples of stages that can block your PvE progression are stages with melee or ranged shields that counter your main DPS, or a powerful enemy of the opposite element. If the first hero you max out is Garam, you may be easily beating every stage right before encountering a ranged shield with no answer to it. Similarly, if you choose to build Rue first, you’ll be heavily invested in Earth, and a powerful fire enemy can block your progression.
Bearing this in mind, it is recommended to build heroes in the following order if possible, provided you have the heroes required. If not, the idea is to skip to the next one you have and hope you get the previous hero while working on it.
Tank – Currently the only ones worth investment are Oghma and Future Princess
A Ranged/Melee buffer – Any unique hero that buffs Melee or Ranged Atk, such as Beth, Eugene, Nari or Tinia
A Healer – Your healer if you want one. Currently the only ones worth investing in are Miya, Gabriel, and Veronica. You don’t necessarily need a healer if you have Future Princess on your team.
A Melee/Ranged buffer – Pick a buffer opposite to the one chosen previously. For example, if you picked Beth, invest in Nari or Tinia
You may be wondering why you would invest in two opposing party buffs, and the reason for this is simply flexibility. This will be explained in our next topic, the Training Room.
Using the Training Room Effectively
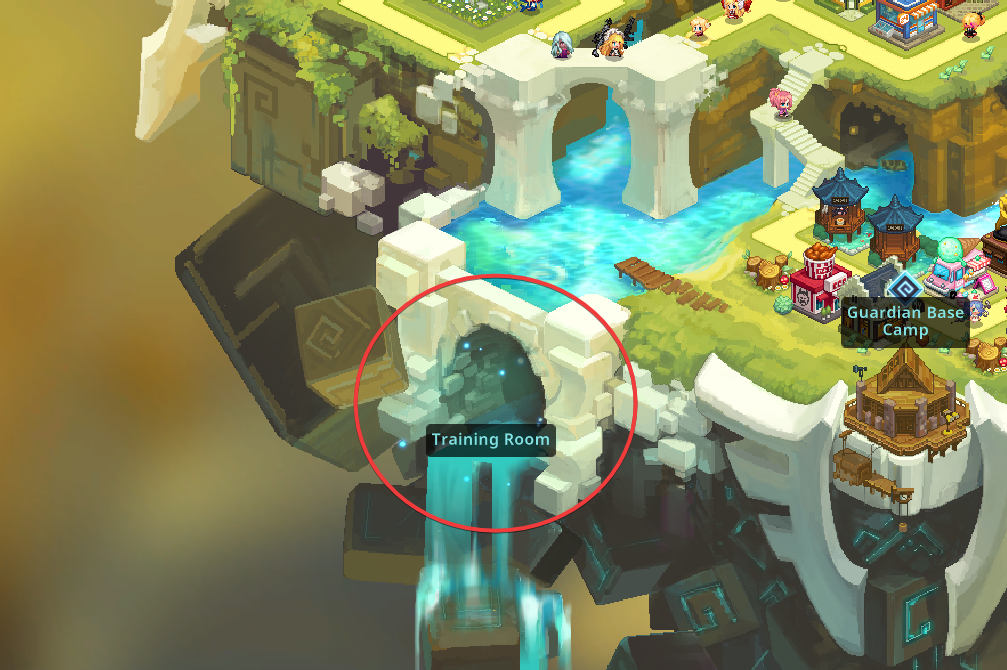
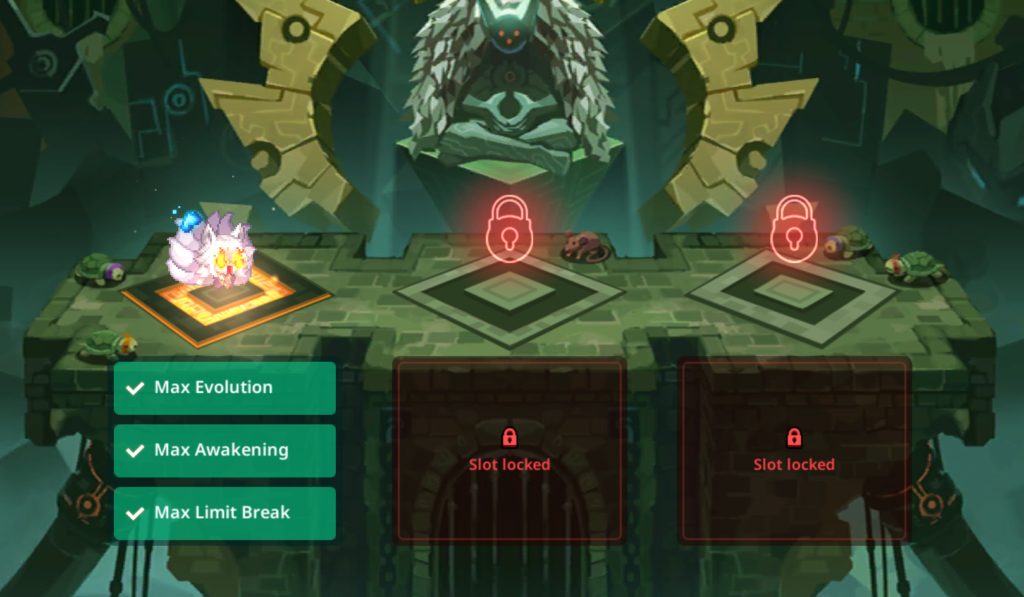
Upon clearing the final stage of World 7, you will gain access to the Training Room in Heavenhold.
The Training Room gives you slots in which you can place heroes to instantly max them out without investing any resources in them for as long as they remain in the slot. This provides new players with a huge spike in power, and is one of the reasons you should focus on completing the story as quickly as possible.
Upon unlocking the Training Room, you will have access to one slot along with the first of three effects, Max Evolution, which will evolve whatever hero is in the slot to 5★, and set them to the maximum level you currently have unlocked based on your progress in the story. The second effect, Max Awakening, will become available once you own at least one unique hero, and unlocks all of the hero’s available awakening nodes. The final effect, Max Limit Break, becomes available upon reaching max limit break with three unique heroes. For this reason, it’s not recommended to invest hero crystals in rare heroes, or into buying evolution stones.
Heroes can be removed from the training room to be replaced with another, but there is a cooldown of 24 hours before you can put your new hero in. The cooldown can be skipped at the cost of 300 gems.
Now that we’ve explained what the Training Room is, we can explain the best way to use it. As mentioned earlier, the first four heroes we recommend you max are a tank, healer, and both a support and melee support DPS. The reason for this is it sets you up with the core of two teams, a melee team, and a ranged team. The fourth slot of your party will be your main DPS, who is uninvested but placed into the Training Room. This gives you flexibility and sets you up for future hardships in the sense that you’re not limited to a main DPS of a single element. If you have Bari as your lead DPS and you run into a fire boss where she’s just not cutting it, you can easily swap her out for Garam and still have a ranged support in place for him.
Here is an example of how your two teams would be structured:
[Your main tank, preferably Oghma], [Your Ranged party buffer], [Your Healer or Future Princess], [Any current/future Ranged DPS in Training Room]
[Your main tank, preferably Oghma], [Your Melee party buffer], [Your Healer or Future Princess], [Any current/future Melee DPS in Training Room]
This way you can switch teams when encountering melee or ranged shields, adapting your main DPS to suit whichever element you need as your collection of heroes and EX weapons grows. Your resources can efficiently be spent on heroes that are versatile in terms of teams and content. Coincidentally, following this strategy will also start you off with some decent raid teams and a good pool of heroes for Arena.
Maxing Your Heroes
First and foremost: never use hero crystals to buy evolution stones for your heroes. Heroes need to be maxed in several ways and require several resources:
Experience– 3,048,860 is needed to get a hero from level 1 to 72, and then 2,580,200 more for 72-77, for a grand total of 5,629,060. Your team’s level cap increases as you progress through the story, with the last five levels being individually locked for each hero until you limit break them.
Hero Crystals – A total of 700 is needed for unique heroes to limit break their max level from 72 to 77, and 350 for rare heroes. You need to evolve your hero to 5★ before you can limit break them.
Evolution Boosts hero’s stats every 40 evolution stones, unlocks additional awakening nodes with each ★, unlocks hero’s Special Ability (5★), unlocks hero’s second card slot (3★), unlocks limit break (5★), changes hero’s sprite
Evolution Stones – 120 to evolve a hero from 2★ to 3★, 320 to evolve a hero from 3★ to 4★, and 840 to evolve a hero from 4★ to 5★, for a total of 1280 for rare heroes and 1160 for unique heroes.
Low/Mid/High Awakening Stones – Varying amounts of each needed for each hero, totals can be seen on their individual pages on this site.
Legendary Awakening Stones – A hard to acquire resource that you typically need 87 of to unlock all of a hero’s most potent nodes.
Gold – Varying amount for each hero to unlock nodes, expect to spend around 1,250,000 gold to unlock all nodes.
Weapon Boosts a hero’s damage – duh, as well as other stats depending on the weapon
Strengthening Hammers – It takes quite a few of these to level a weapon up to the maximum level, it’s not recommended to use any equipment as fodder since you can use them collection and random evolution.
Gold – 25,000 needed for each limit break, as well around 1.2m to use Strengthening Hammers.
Duplicate Weapons or Limit Break Hammers – 5 needed in addition to your original weapon to max limit break.
Accessories and Shields have been left out here as these aren’t exclusive to each hero, you can invest in them to share between several heroes
Most of these resources will come naturally to you as you spend coffee on anything, but you’ll need to farm the appropriate Evolution Dungeon in the Rift for the unique hero you’re working on in order to get their evolution stones. This is one of the reasons that it’s recommended to focus all of your resources on one hero at a time, as even if you have the rest of the heroes for your dream team, you can only evolve one unique hero at a time.
While farming Garam stones, you’ll get evolution stones for all of the rare water heroes
The good news is, you can supplement your team with rare heroes of the same element, as you’ll be getting evolution stones for them at the same time. If you choose to work on Oghma first, you’ll be able to evolve Karina, Gremory, Yuze, and Shapira at the same time, and you may find that they’re better than your other heroes that are waiting for you to finish investing in Oghma. These heroes also tend to synergize well with each other as they can form a mono element team.
You can spend excess experience on these rare heroes for a short term gain of strength, but don’t awaken them as awakening stones are harder to come by than experience.
Completing Your Book
When you get to a stage where your heroes are evolved and leveled up, the next step to increasing their power is to make sure you’re working on filling your book. Filling the book is an extremely lengthy and expensive process.
The book is divided into two sections, Heroes and Items. Each section has bonuses based on your heroes’ progression and what items you’ve obtained.
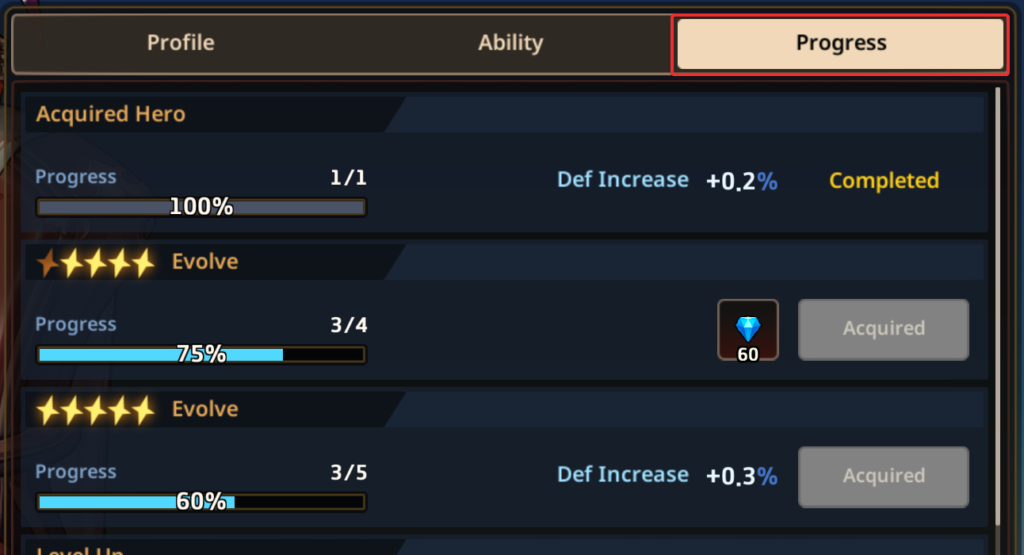
For Heroes, each hero has its own book entry, and if you select any of them and go to the Progress tab, you will see various milestones you can reach on that hero to unlock various rewards. Most are gems, but some grant permanent stat boosts to any and all heroes you use.
These milestones are:
When you obtain the hero
When you evolve the hero to 5★
When you unlock a certain number of awakening nodes on that hero
It’s important to note that the number of awakening nodes required is the number of nodes available to that hero at 5★. When you limit break a hero, they obtain additional nodes, and these also count towards completion. So if you want to skip certain nodes that give Damage Reduction or you think are a waste of stones, you can as long as you’re limit breaking the hero. Otherwise, if you’re keeping the hero at 5★ you will need to unlock every node.
Another important thing to take away from this, is that you never want to use the Hero Reset stones or Awakening Reset stones that you get from events until you’ve obtained all the relevant rewards from the Progress tab for the hero you’re using them on. If you’re thinking of using an Awakening Reset stone on a hero that you’ve half invested in, get the hero to 5★ and max awaken them first to unlock the stat bonuses, then reset them to get all of your stones back. If you’re using a Hero Reset stone, you may as well make sure you’ve limit broken them 5 times first for that 100 gems.
On another side note, I would also recommend not using Hero Reset stones on rare heroes. When you reset a Unique hero, you get all of the evolution stones you farmed for them back as hero crystals. It may be tempting to spend those hero crystals to buy evolution stones to immediately max another hero, but hero crystals are much more difficult to obtain than evolution stones. If you take the 1280 hero crystals, you have enough to MLB a unique hero and an extra 580 to use on another.
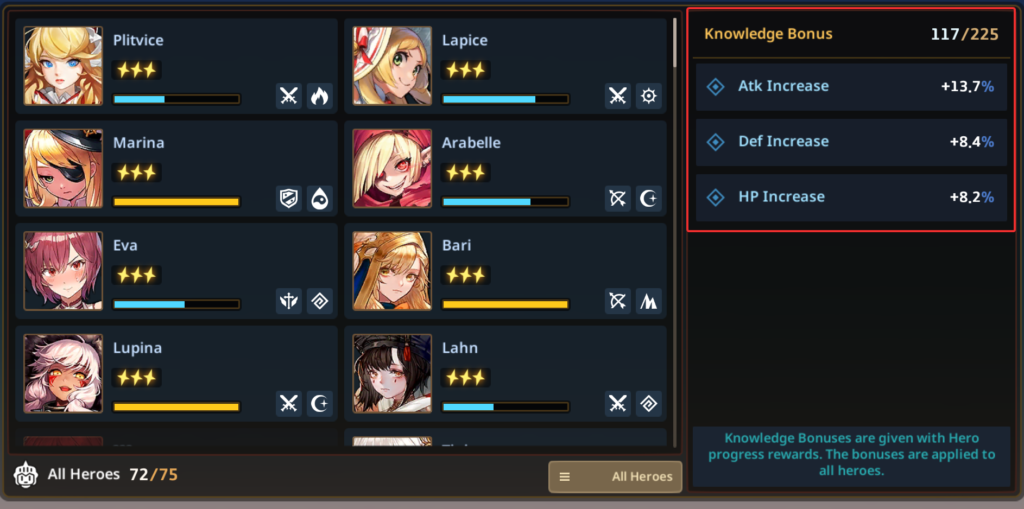
As you max out heroes, and unlock their Progress entries you can see the total boost you get on the right of the Heroes section in the book:
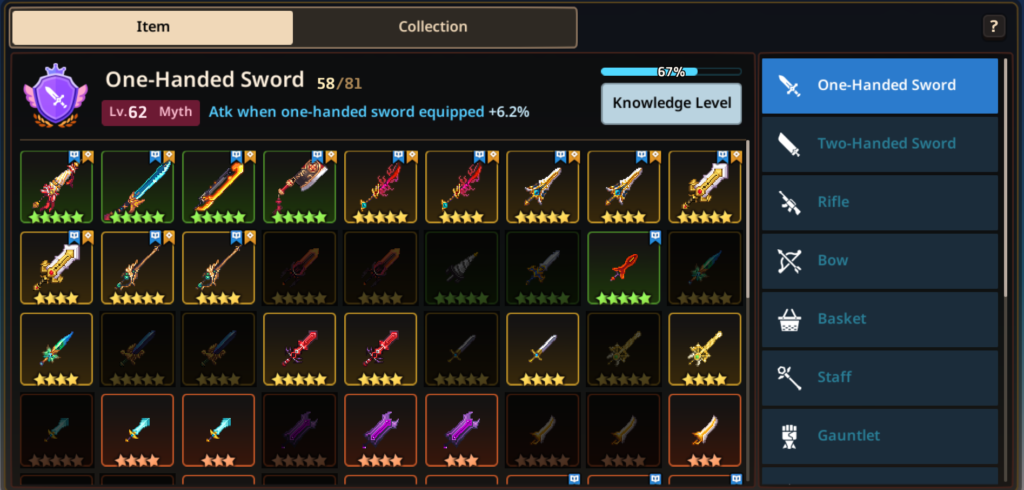
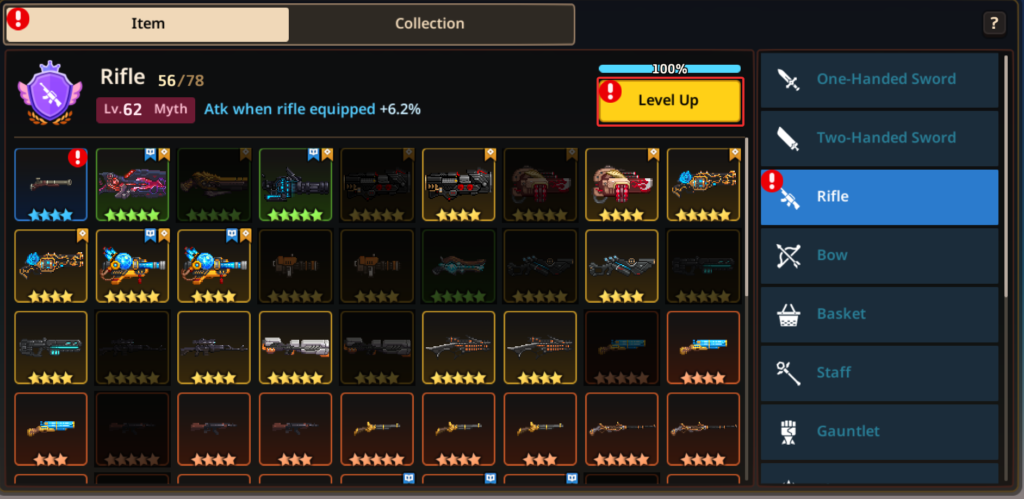
The Items section of the book has two tabs. The first tab, which is just called Item, has different categories of items on the right and all of the items for that category on the left.
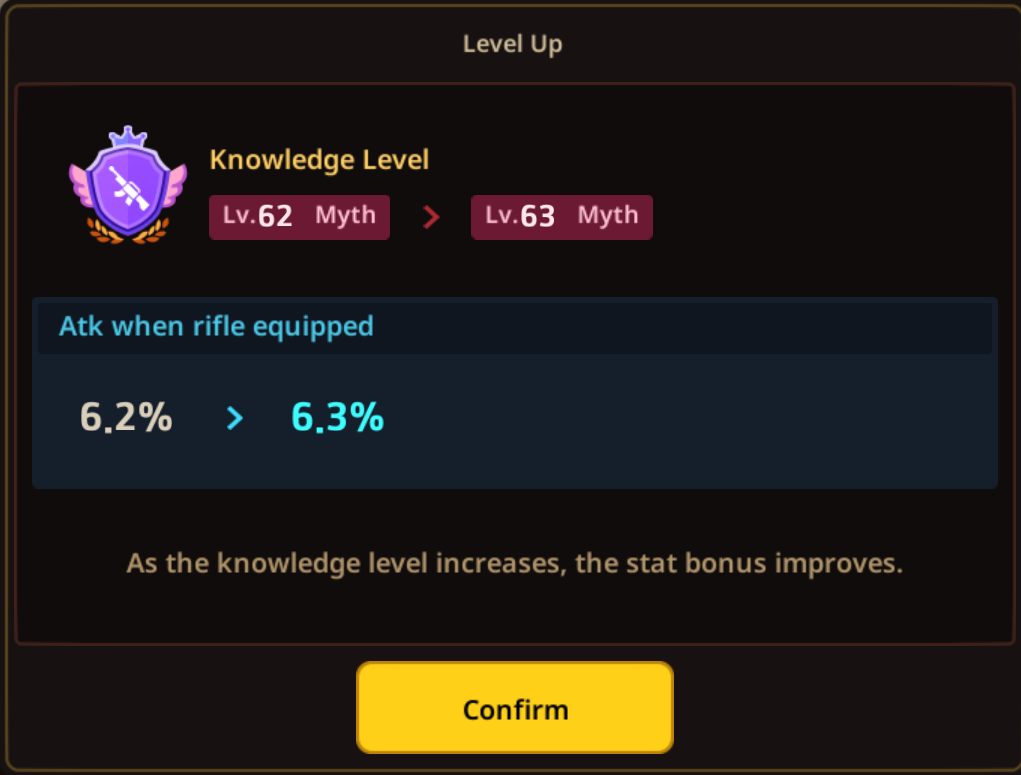
As you collect items, they will grant you gems upon checking the book, and you can click Level Up as shown below to increase the stat bonus gained from that category.
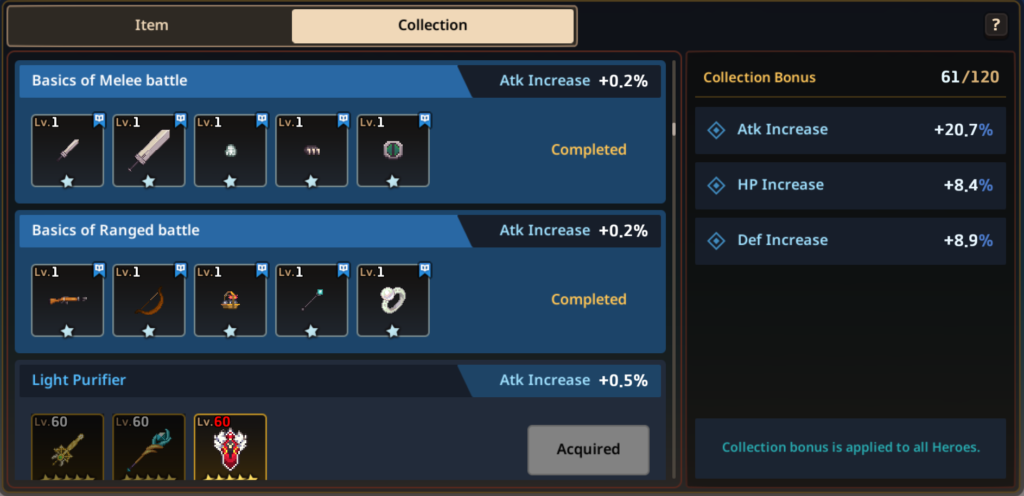
The second tab, Collection, has various combinations of equipment and costumes that grant stat bonuses once you’ve collected them all. Equipment collections may require you to level each piece to level 60. The total stat bonus from all of your unlocked collections can be seen on the right of the Collection tab.
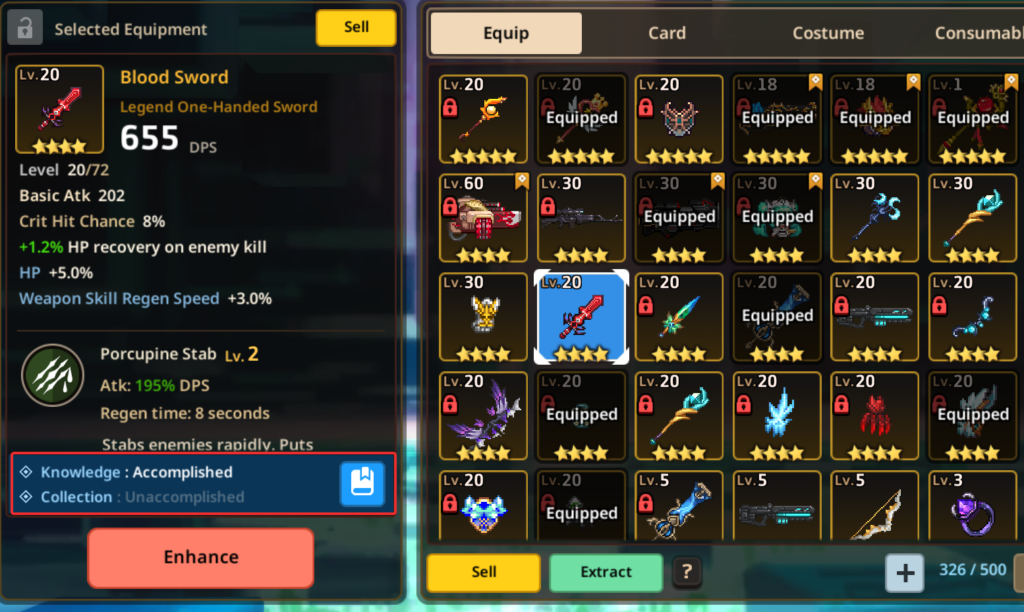
The most important thing you can do to speed up the process of completing all your collections and book entries as a beginner, is to not sell or evolve any equipment unless it’s a duplicate or you’ve already gained all the knowledge/collection bonuses that item has to offer. This also means don’t use equipment as fodder to enhance other equipment. You will also want to buy all the costumes and equipment costumes you can possibly afford to from their respective shops.
Considering that you need to obtain all of these items, Item Dungeon is generally the most efficient option when it comes to farming Resource Dungeon. Not only does it allow you to fill your collection, but it also has a small chance of giving 5★ items, including Epic Exclusives. This means you don’t need to spend gold on some items if you’re lucky enough to get a 5★ item drop, as to evolve from 4★ to 5★ otherwise costs 230,000 gold. On top of this, you’ll already get enough experience to get by so wasting coffee on Exp Dungeon isn’t worth it, and you can sell the enhancement hammers that drop from Item Dungeon for the gold that you will inevitably need. This way you’re killing two birds with one stone.
As you collect items, you can quickly see which items in your inventory you’ve completed collections and obtained every evolution for on the bottom left when the item is selected:
You can click the small blue book button on the right to see which evolutions or items in the relevant collections you’re missing.
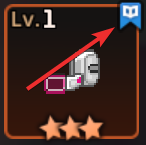
Once an item is Accomplished for both Knowledge and Collection, you’ll also get a small book ribbon on the top right of the item’s icon, indicating that it’s safe to use in random evolution or whatever you want to do with it.
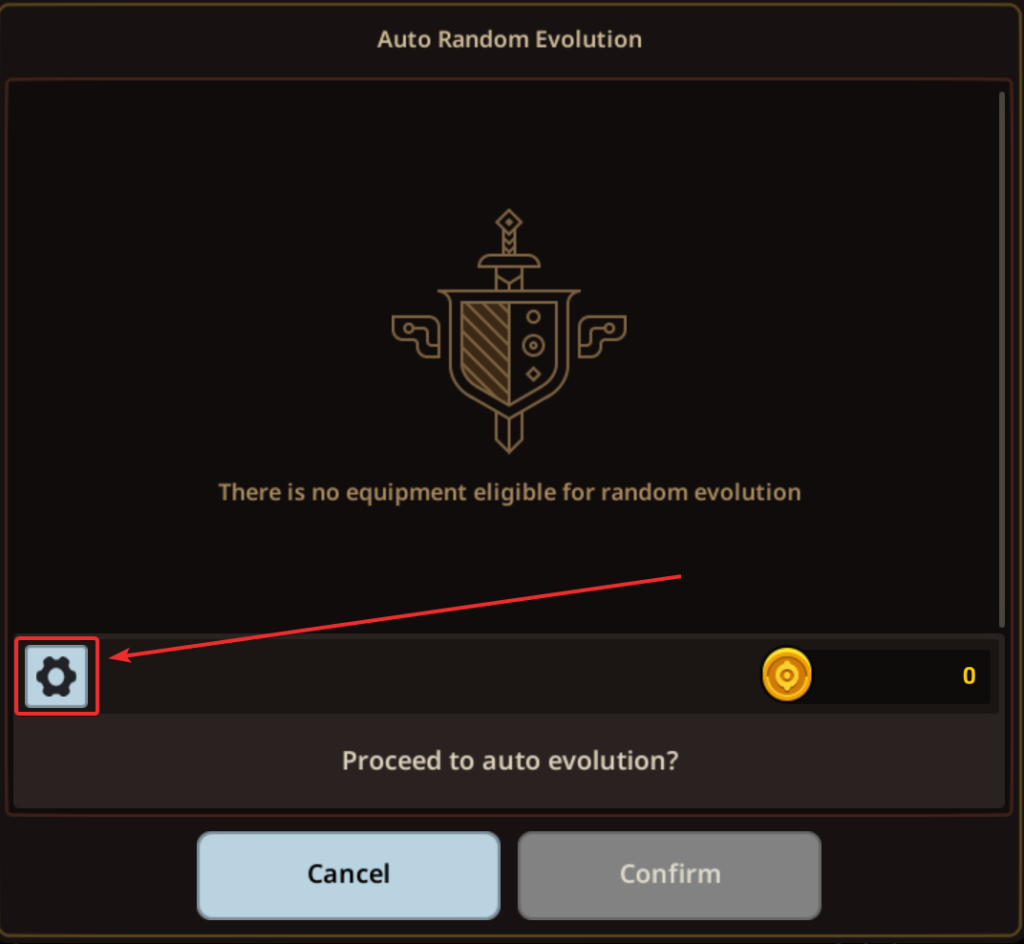
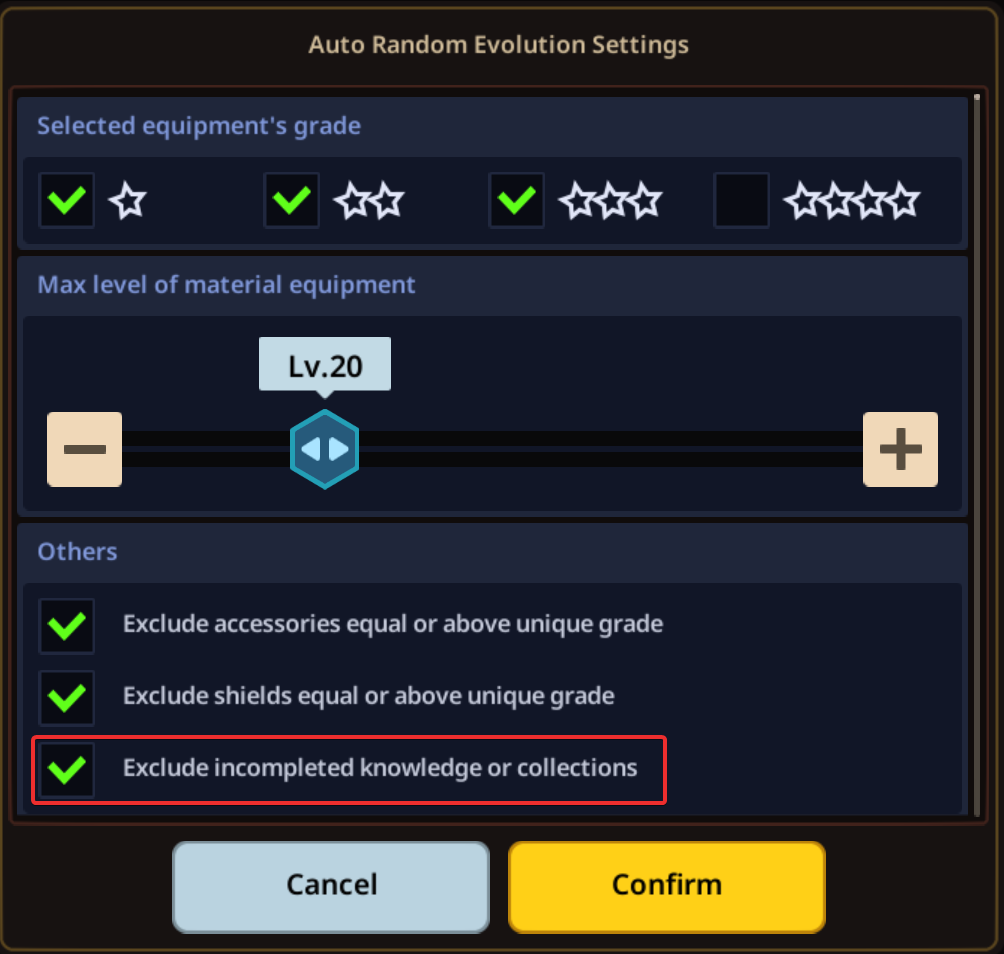
Random evolving is a very useful feature that will let you exchange a number of lower grade items for the next tier up. If you have three 1★ items, you can random evolve them into a 2★ item. There is also a feature you can use to automatically random evolve all of the items you’ll end up getting as you progress and farm Item Dungeon.
Clicking the gear on the left will allow you to filter out items you haven’t completed both Knowledge and Collection for, which is a huge timesaver but isn’t checked off by default.
The number of items required for each grade are as follows:
Received Grade Item
Requirements for 100% Chance
2★ Item
Three 1★ items. (Base item + two at 50% chance each)
3★ Item
Five 2★ items. (Base item + four at 25% chance each)
4★ Item
Nine 3★ items. (Base item + eight at 12.5% chance each)
5★ Item
Eleven 4★ items. (Base item + ten at 10% chance each)
Items to Be Aware Of
Epic
“Mirror” Accessories
Typically Best in Slot accessory for each respective element with a spread of both offensive/defensive stats, they drop in Mirror Rift and are purchasable using Mirror Shards Captain’s Mirror Shield
A good end game shield with balanced stats that is purchasable using Mirror Shards which you can farm in Mirror Rift, meaning you can MLB it without relying on luck Mad Panda Brooch
Can be gotten for 600 medals, good defensive accessory but very hard to MLB Minotaur’s Necklace
Can be gotten for 600 medals, good offensive stats but very hard to MLB Ice Queen Ring
Great for water heroes, only available through gacha and random evolution/rewards making it extremely hard to MLB Earth Necklace
Solid healing accessory, only available through gacha and random evolution/rewards making it extremely hard to MLB
Keep all epics
Legend
Honor Ring
Mostly defensive accessory with % Atk, gives % Def when MLB, making it great for tanks Black Crown Ring
Mostly defensive accessory with Skill Regen, gives % Def when MLB, making it great for tanks Ring of Belief
Good offensive spread with some nice Minotaur’s Shield
Can be bought for 400 medals, good candidate to MLB with legend hammers Ocean Earring
Great healer accessory, can be gotten from stage 8-3, good candidate to MLB with legend hammers Cursed Necklace
Decent offensive accessory for Dark heroes if you have nothing better, not worth hammering to MLB
Keep the rest as well to level to 60 and complete collections for more stats
Unique
Ring of Fortress
Tankiest accessory that can easily reach MLB Sharp Shooter
Best Crit accessory, has 10% crit once it’s MLB, on top of Atk and Skill Damage Gold Pocket Watch
Good offensive item with Weapon Skill Regen Crescent Moon Earring
Easy source of Crit/Skill Damage/Atk and HP Earring of Dark Desire
Solid mix of offensive/defensive stats Mirror Shield
A good starter shield with tons of Weapon Skill Regen Speed that is easy to MLB Tanker Shield
Decent purely defensive shield if you have nothing better Blade Shield
Shield with good offensive stats if you can MLB it Sacred Rosary
Not the best, but if you happen to MLB it before anything else you may want to use it for a while
Content
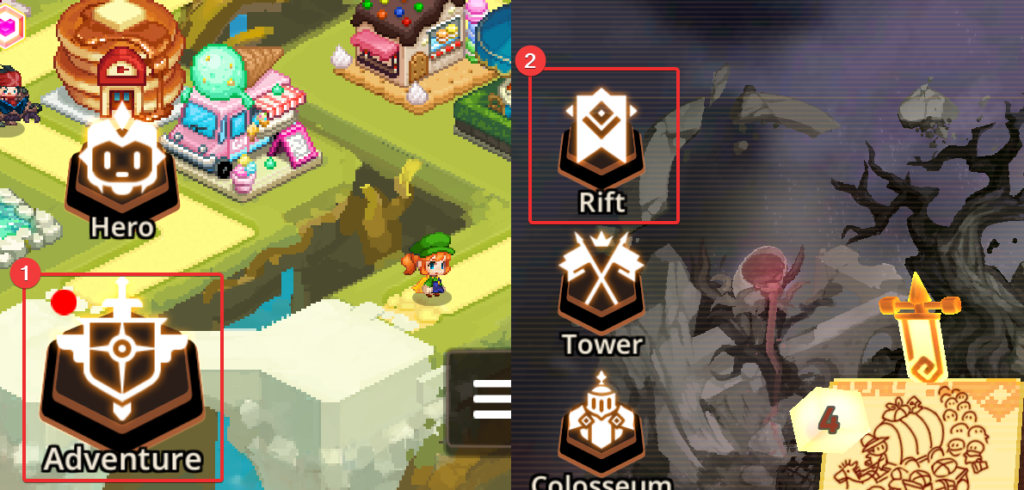
Story
What it is: Play through a series of chapters and stages to experience the game’s story. Each main stage is denoted by the world number followed by a stage number. For example, stage 3 of world 2 would be 2-3. Unlocking each stage costs coffee, but they can be re-entered freely after.
What you get:
Unlocks the ability to Summon upon completing stage 1-4
Unlocks the rift where you can farm resources upon completing stage 1-4
Unlocks the Tower upon completing stage 1-5
Unlocks the third slot of your team upon completing World 1, and the fourth slot upon completing World 2
Unlocks the Colosseum and side stories upon completing World 3
Unlocks the Arena, Tower of Horizon, and Co-op upon completing World 4
Unlocks the Guardian Camp HQ upon completing World 5
50 for each star achieved (each sub stage has one, and each main stage has three)
from achievements for completing worlds
Purple coins scattered throughout each stage, each world has different purple coins
10 times the stage’s coffee cost in event points towards the current event, if there is one happening
Various equipment, cards, and costumes as stage/quest rewards, or in treasure chests
Rift
What it is: Series of stages where you can spend coffee to farm resources for maxing out your heroes
The Rift is separated into several types of dungeons, and each one has its own set of stages that increase in difficulty as the monster level increases.
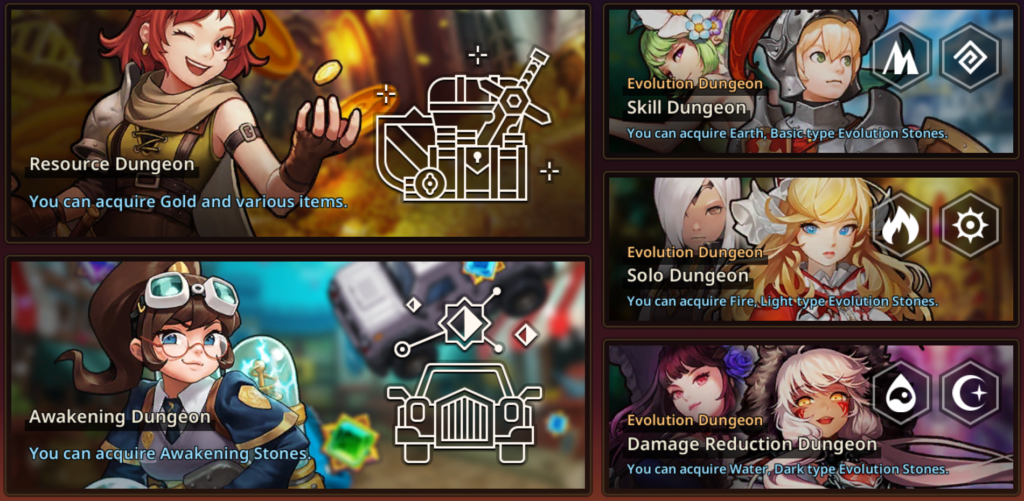
Resource Dungeon
The Resource Dungeon is further divided into three dungeons, which are Gold Dungeon, Exp Dungeon, Item Dungeon. Gold Dungeon can be farmed for gold, Exp Dungeon can be farmed for experience to level your heroes with, and Item Dungeon can be farmed to get random equipment and hammers to enhance them with.
Evolution Dungeon
There are three Evolution Dungeons, but they are just different sets of stages for different pairs of elements. Aside from that, each element has its own stage rules, such as only abilities do damage. These stages are not difficult as long as you’re farming around your level, so there’s no real need to go into depth on the various rules.
Awakening Dungeon
Awakening Dungeon is a dungeon you can clear three times daily to obtain awakening stones. You can pay 300 gems to reset your entries if you want to keep farming, but there are better ways to spend gems so it’s not recommended.
The stages are just a bunch of cars you need to kill before the timer runs out, making them DPS checks. Each car drops awakening stones according to which dungeon you’re in, and sometimes you’ll get gold cars which can drop Legendary Awakening stones, regardless of the dungeon. There are different dungeons within Awakening Dungeon, and they rotate based on the day of the week as follows:


 from achievements for completing worlds